If you want to keep tabs on your turbocharged engine’s performance, a boost gauge is a solid investment. It lets you see the pressure your turbo makes, which is handy for spotting issues early and dialing in your setup.
Installing one can look intimidating, but honestly, with the right tools and some patience, you can pull it off at home. No need for drilling holes or tearing the car apart.
The most important thing is hooking the gauge up to your intake manifold and mounting it somewhere you can actually see while driving. You’ll also want to run the power and ground wires carefully, so nothing gets pinched or fried.
Key Takeways
- Get all your parts and tools together before you start.
- Tap into the right spot on your engine for the boost line.
- Mount the gauge and make sure it works before hitting the road.
Tools and Components Needed
Having the right stuff on hand makes this job way less frustrating. You’ll need a few basics to get started.
Essential Tools
Grab a wire crimping tool for safe electrical connections.
Wire strippers are a must for prepping your wires.
You’ll probably need a drill or just a screwdriver, depending on how you’re mounting the gauge.
Zip ties are great for keeping things tidy and rattle-free.
A small wrench or socket set might come in handy for any hose fittings.
Required Materials
Pick a boost gauge that fits your car and your taste.
You’ll need vacuum tubing or boost lines—make sure they can handle heat and pressure.
Grab some wire for the power and a solid ground wire too.
Electrical connectors and heat shrink tubing help keep your wiring safe from moisture and shaking.
Don’t forget mounting hardware, like brackets or screws, to keep everything in place.
Choosing the Right Boost Gauge
Decide if you want an analog needle or a digital display.
Check that the gauge’s pressure range matches what your engine puts out.
It should be easy to read, especially if you’re glancing at it while driving.
If you drive at night, backlighting is a nice touch.
Honestly, stick with a brand you trust—accuracy matters here.
Preparing for Installation
Before you get your hands dirty, a few safety steps are worth taking. Picking the right spot to tap into your engine matters more than you’d think.
Ensuring Engine Safety
Let your engine cool off first—burns aren’t fun. Disconnect the battery so you don’t accidentally short anything.
Wear gloves and eye protection just to be safe. A clean, well-lit workspace helps you avoid dumb mistakes.
Check your car’s manual for any warnings about tapping into the intake manifold or vacuum lines. You don’t want to mess something up and get weird readings.
Locating the Intake Manifold
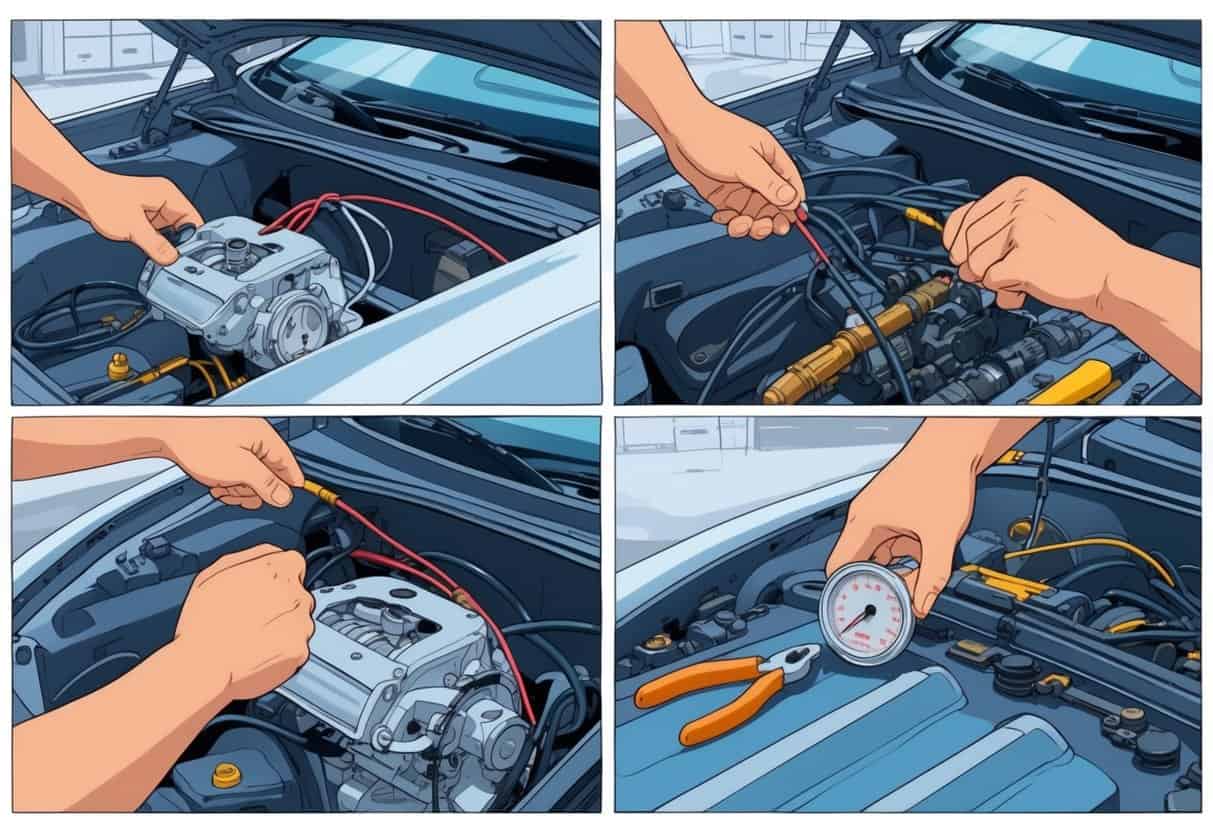
The intake manifold is where you’ll get the most accurate boost reading. It sits up top and channels air into your engine.
Look for a vacuum hose running from the intake manifold. You’ll splice into this with a “T” fitting for the boost line.
A flashlight helps spot any cracked or leaky hoses. Go for one that’s easy to reach and close to where you plan to mount the gauge.
Definitely avoid hoses that carry fluids or look brittle.
Step-by-Step Boost Gauge Installation
Mount the boost gauge where you can see it easily. Then, run the vacuum tubing from the intake manifold to the gauge.
Installing the hose fitting tightly and using a rubber grommet for protection is key. You don’t want leaks or a chewed-up hose.
Mounting the Boost Gauge
Pick a spot that’s clear and easy to glance at—dash or A-pillar pods are popular. Use a mounting bracket or some strong double-sided tape made for cars.
Make sure it’s not blocking your view of the road. Double-check that your wires and tubing will reach without stretching.
Routing the Vacuum Tubing
Run the tubing from the intake manifold to the gauge. Try to avoid sharp bends, kinks, or hot engine bits.
Zip ties help keep the tubing in place and away from moving parts. Leave a little slack, but not so much that dirt or water can collect.
Installing the Hose Fitting
Find a boost port or tap into the intake manifold for your fitting. Push it in firmly so it won’t leak.
If needed, use thread sealant or a bit of Teflon tape for a tight seal. Don’t go overboard tightening—it’s easy to crack things.
Using a Rubber Grommet
Whenever the tubing passes through metal—like the firewall—use a rubber grommet. It’ll keep the hose from rubbing through and leaking.
Pick a grommet that fits snugly in the hole. Pop it in first, then feed the tubing through.
Final Adjustments and Testing
Once everything’s hooked up, double-check all your connections. Tidy up your wires and hoses so nothing flops around or rubs.
Fire up the car and see how the gauge behaves. If it’s not working, don’t panic—there are a few common things to check.
Securing Connections with Zip Ties
Zip ties are your friend here. Secure all cables, wires, and vacuum hoses so they can’t move around.
Bundle everything neatly and avoid tight bends, especially with wires. Make sure the vacuum hose is solidly attached at both ends.
If it wiggles, zip tie it to something sturdy in the engine bay. Snip off the extra length on your zip ties so nothing gets snagged.
Verifying Proper Function
With everything buttoned up, start the engine and let it idle. The gauge should show vacuum at idle—if it’s digital, you’ll see the numbers drop.
Lightly rev the engine and watch the gauge respond. The needle (or display) should move up smoothly as boost builds.
If you’re not seeing any boost or the gauge stays at zero, check your hose connections and make sure nothing’s blocked. Sometimes it’s just a loose fitting.
Testing like this gives you peace of mind that your boost gauge will work out on the road.
Troubleshooting Common Issues
If the gauge isn’t moving or the readings look off, start by inspecting all hose connections. Even a tiny vacuum leak can make the gauge stay near zero or jump all over the place.
Check that vacuum hose for any cracks, holes, or kinks. If you spot damage, swap it out—otherwise, you’ll never get a proper boost reading.
If your gauge has lighting or a sensor, double-check the electrical wiring. Sometimes it’s just a loose ground or a busted connector that’s causing trouble.
Honestly, it’s best to go step by step: hoses first, then wiring. Only after that should you start suspecting the gauge itself.
